
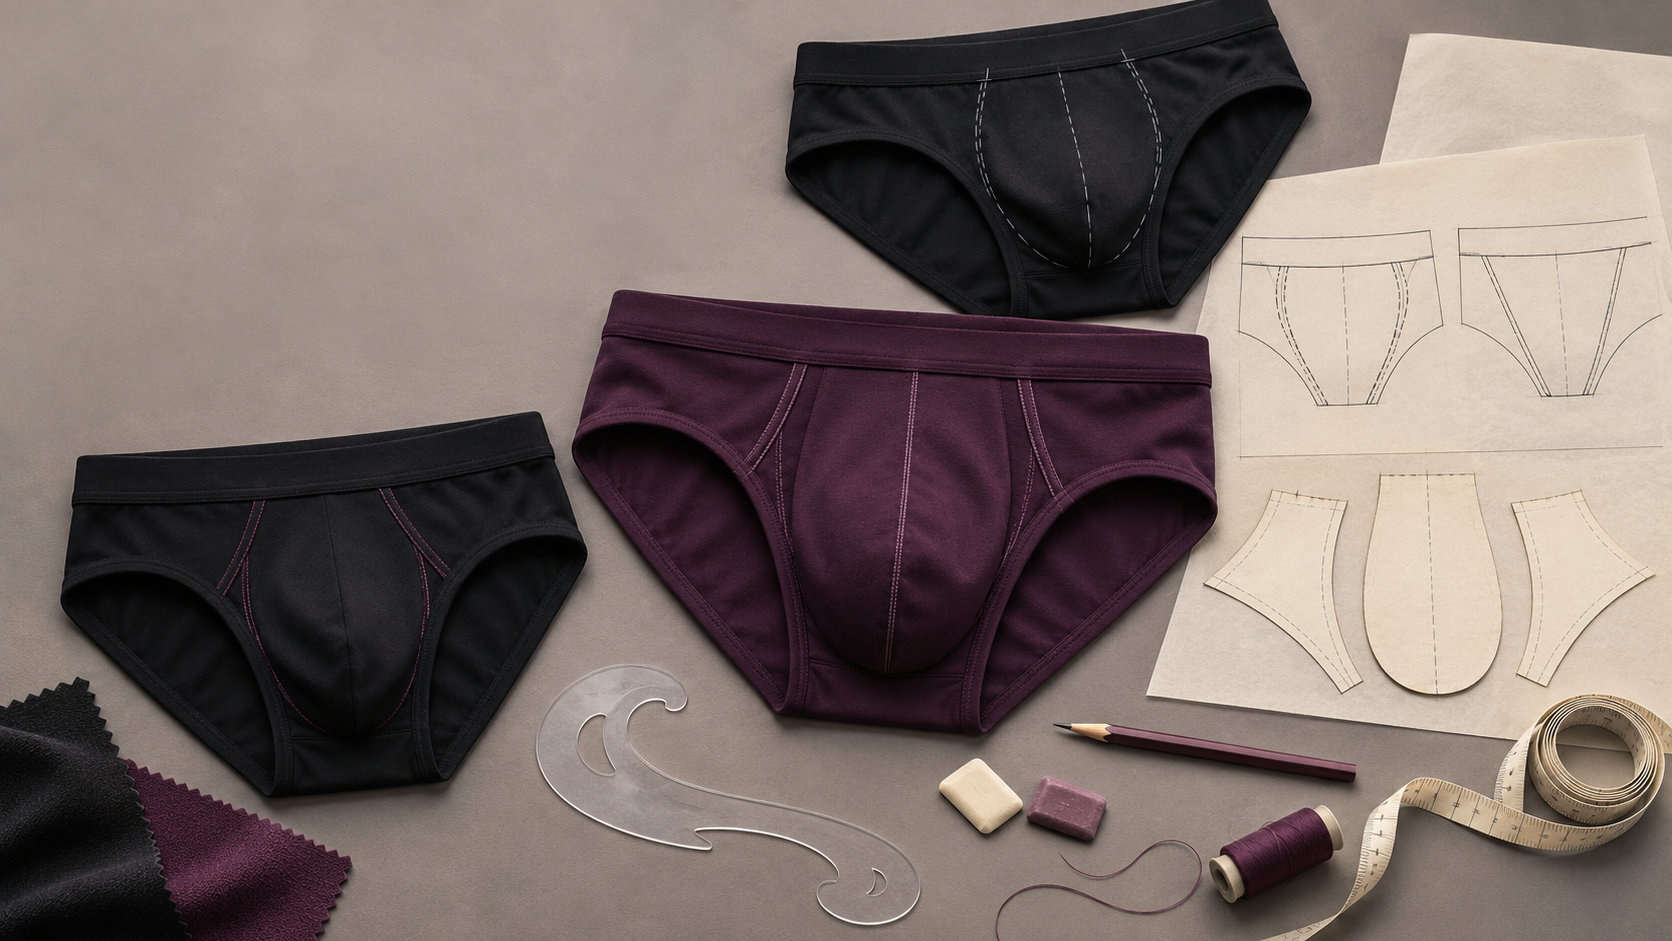
Underwear pouch seam placement is part of the three-dimensional pattern, not a decorative line added after the pouch shape is chosen. A seam can join panels, create volume, redirect stretch, stabilize an edge or frame the intended silhouette. The same route can also create bulk, pressure, distortion or visible ridges when its curve, allowance, material and construction do not work together.
Brands should therefore approve three things as one system: the seam geometry on the pattern, the inside construction against the body and the result on a fitted sample. A product name such as “contoured” or “enhancing” cannot replace that review.
What does a pouch seam actually control?
A pouch seam controls how flat pattern pieces become a shaped front. Moving the seam changes more than appearance: it can change where volume is introduced, how the fabric stretches, where the seam allowance sits and how the pouch connects to the front body, crotch and leg opening.
This is why a seam cannot be judged from a front photograph alone. Two products may show a similar curved line but use different panel shapes, stretch directions, linings or internal support. Conversely, two different-looking seam maps may create a similar wearer outcome.
If the pouch direction is not yet selected, first compare the options in Contoured vs Anatomical vs Enhancing Pouches. Once the direction is clear, the seam map becomes a separate engineering decision.
A decision matrix for common pouch seam routes
| Seam route | What it may help create | Main review risks | What the sample must prove |
|---|---|---|---|
| Curved center seam | Symmetrical shaping and forward volume from paired panels | Bulk at the center, visible ridge, twisting or an incorrect curve position | Symmetry, comfortable inside finish, stable projection and no unwanted rotation |
| Paired side or diagonal seams | Volume distributed away from the center and a framed visual shape | Pressure at panel edges, uneven stretch, mismatch where seams meet other garment lines | Balanced left-right tension, smooth joins and the intended visual framing |
| Inset panel or gusset-like section | Localized room, support or material control | Extra intersections, assembly bulk, lining displacement or difficult grading | Clean junctions, stable insert position and repeatable shape across sizes |
| Reduced-seam or single-panel front | Smoother interior and fewer visible construction lines | Reliance on fabric stretch, collapse, flattening or uncontrolled movement | Adequate room and support without overstretching or edge instability |
These are development directions, not fixed recipes. A style may combine routes, and the final choice remains subject to pattern, material and sample review.
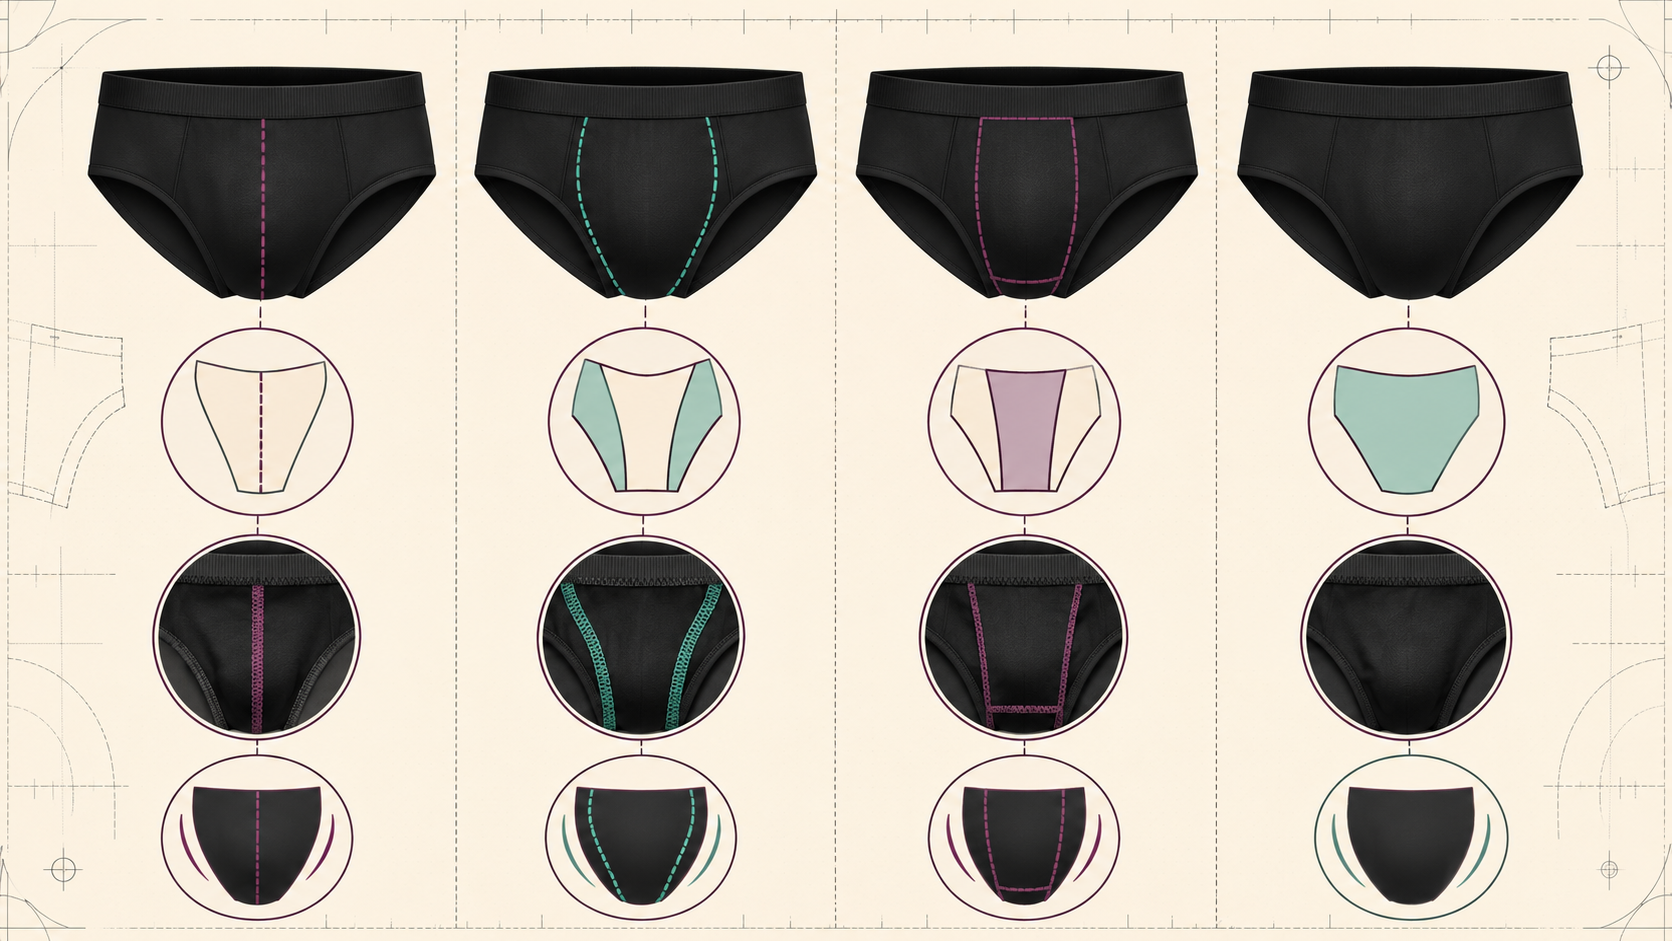
Separate seam route from seam construction
The route answers where the seam runs and what shape it creates. Seam construction answers how the panels are joined and finished. A tech pack should not collapse these into one vague note such as “soft curved seam.”
For close-fitting knitted underwear, the construction decision may involve overlock, coverseam, flatseam or another project-specific method. Coats lists several stitch families for men’s briefs but also states that substrate, garment construction, seam demand and appearance affect the final selection. Those published recommendations are useful starting points, not universal settings for every pouch.
The development team should review the seam allowance, thread and stitch bulk, extensibility, recovery, edge finish and contact surface with the actual fabric. A visually clean exterior does not prove that the inside is suitable for the target wearer.
How should comfort be evaluated?
A center seam is not automatically uncomfortable, and removing it does not automatically create comfort. Comfort depends on where the route sits on the target body, how much bulk remains inside, whether the seam rotates under stretch and how the surrounding pouch and leg opening manage tension.
Mark potential contact zones during sample review. Check the sample while standing, sitting and moving, then record the exact location and condition of any pressure, rubbing or edge contact. “The pouch feels uncomfortable” is too broad to guide a correction; “the lower center allowance folds inward during seated movement” gives the pattern and sewing teams a testable issue.
Anthropometric definitions can help teams use body measurements consistently, but they do not produce a finished seam location. The product still needs a defined target fit, pattern development and wear trials.
How does seam placement change projection and visual balance?
Projection comes from the relationship between panel curvature, added volume, material behavior and restraint—not from the seam line alone. A deeper curve may introduce more three-dimensional shape, but the result can collapse if the material lacks recovery or if the surrounding pattern pulls the volume backward.
Visual balance also depends on where the seam begins and ends. A route that meets the waistband, leg opening or crotch at an awkward angle can make the front look skewed even when the pattern is technically symmetrical. For body-enhancing styles, review the silhouette from the front, side and three-quarter views. Do not approve projection from one flat-lay image.
When measurable pouch depth and volume callouts are needed, use the method in How to Specify Pouch Depth and Volume in a Men’s Underwear Tech Pack. Seam placement should support those defined points of measure rather than replace them.
What should the tech pack show?
- Front and inside views: show every pouch panel, seam and lining edge.
- Seam start and end points: identify how the route meets the waistband, front body, crotch and leg opening.
- Panel identity: use clear piece names and match them to the bill of materials and pattern.
- Construction intent: state whether a seam primarily creates shape, joins a lining, controls an edge or adds support.
- Appearance requirement: define whether the seam should be prominent, subtle, covered or visually aligned with another garment line.
- Inside requirement: show the intended allowance direction, covering or finish where it matters to skin contact.
- Sample checkpoints: list symmetry, rotation, bulk, puckering, pressure, projection and recovery after movement.
Do not place a universal seam coordinate into every size. The grading rule must preserve the intended volume and route relationship rather than simply enlarge the drawing.
Approve the sample in three layers
1. Geometry
Lay the sample flat without forcing it into shape. Check panel identity, seam curve, matching points, symmetry and how the route connects to surrounding pattern pieces. Compare the garment with the approved pattern version and measurement method.
2. Inside construction
Turn the garment inside out. Review allowance direction, bulk, loose thread, skipped stitches, lining position and every intersection. Stretch the seam in the intended direction and check whether it recovers without obvious damage or distortion.
3. Worn result
Review the target silhouette and support through realistic movement. Record pressure or movement issues by location and action. Photograph the same views for each sample round so changes can be compared rather than judged from memory.
Check the seam map across sizes and production
A seam route that works in one fit size can lose its purpose when grading changes the curve, panel proportion or intersection position. Review at least the project’s defined critical sizes and confirm whether the visual center, pouch room and contact zones remain consistent with the approved intent.
Production control should connect the approved pattern to cut-piece identity, notches, seam matching, symmetry and finished appearance. Exact tolerances and inspection methods are project-specific; they should be agreed after the sample establishes a workable construction.
Common briefing mistakes
- Copying an exterior seam line without understanding the hidden panel geometry.
- Using “anatomical,” “contoured” or “enhancing” as if it were a complete seam specification.
- Approving only a flat lay and ignoring the inside construction and movement result.
- Changing seam placement without rechecking pouch volume, rise, crotch join and leg opening.
- Giving exact stitch settings before the fabric and construction have been reviewed.
- Grading the seam route mechanically without checking whether its shaping purpose survives.
Develop the seam map through sampling
SensualForm can support custom pouch construction through pattern development, cut-and-sew production, material review, sampling, fit adjustment and quality control. The final seam route, construction method, material, dimensions and acceptance criteria remain subject to design and sample review.
For a new project, use SensualForm’s OEM and ODM development process, or send your pouch sketch, reference views and target silhouette for review.


